Rainbow Cake: A Slice of Nostalgia in Every Bite
There’s something truly magical about a Rainbow Cake. It’s not just the vibrant layers or the sweet scent wafting through the kitchen—it’s the memories it stirs. I remember standing on a stool, barely tall enough to see over the counter, watching my grandmother divide batter into bowls and swirl colors with a careful hand. She always said baking a Rainbow Cake was like painting happiness onto a plate.
Now, every time I whisk those colors together, I feel her beside me, humming an old tune, the kitchen filled with the warmth of shared moments. A Rainbow Cake isn’t just a dessert; it’s a celebration of childhood joy, birthdays filled with laughter, and the simple wonder of color and taste intertwining. Much like the first time I baked my Happy Birthday Cake, this Rainbow Cake holds a special place in my heart.
Why You’ll Love It
Every time I bake a Rainbow Cake, the kitchen feels a little brighter, like a patch of sunlight on a cloudy day. It’s not just about its dazzling appearance—though those vivid layers do feel like slicing into a rainbow—it’s about what it represents: joy, creativity, and a sprinkle of nostalgia.
The first bite is a soft, buttery whisper, followed by a hint of vanilla that melts on the tongue. The colors may look bold, but the flavor is pure comfort—sweet but not too sweet, tender but with just enough structure to hold those magical layers together. It reminds me of my first taste of the Matilda Chocolate Cake, a moment of pure, simple pleasure.
Whether you’re celebrating a birthday, a special milestone, or just craving a little cheer, this Rainbow Cake fits perfectly. It’s a cake that doesn’t just sit pretty on the table—it sparks conversations, memories, and a few gasps of delight.
And much like a Butterfly Cake, it’s the kind of dessert that turns any gathering into something unforgettable.
Rainbow Cake: A Slice of Nostalgia in Every Bite
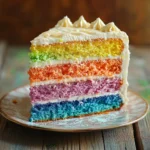
Rainbow Cake is a vibrant, multi-layered masterpiece that combines the nostalgia of childhood celebrations with soft, buttery layers and a hint of vanilla. Every slice reveals a burst of color, making it perfect for birthdays, milestones, or any joyful occasion.
- 3 ½ cups 420g all-purpose flour
- 2 ½ tsp baking powder
- ½ tsp baking soda
- 1 tsp salt
- 1 cup 230g unsalted butter, softened
- 2 cups 400g granulated sugar
- 5 large eggs (room temperature)
- 1 tbsp pure vanilla extract
- 1 ½ cups 360ml buttermilk, room temperature
- Gel food coloring (red, orange, yellow, green, blue, purple as needed)
- 2 cups 460g unsalted butter, softened (for frosting)
- 6 cups 720g powdered sugar, sifted (for frosting)
- 2 tsp pure vanilla extract (for frosting)
- 2 –4 tbsp heavy cream or milk (for frosting)
- Preheat oven to 350°F (175°C). Grease and line six 6-inch cake pans or bake in batches if necessary.
- In a bowl, whisk together flour, baking powder, baking soda, and salt.
- In another bowl, beat butter and sugar until light and fluffy, about 3–5 minutes.
- Beat in eggs one at a time, then stir in vanilla extract.
- Add dry ingredients in three parts, alternating with buttermilk, starting and ending with dry ingredients. Mix just until combined.
- Divide the batter evenly into six bowls and tint each with a different gel food color.
- Pour each color into the prepared pans and bake for 15–18 minutes. Let cool completely on wire racks.
- For the frosting, beat butter until creamy. Gradually add powdered sugar, vanilla extract, and cream or milk until smooth and fluffy.
- Assemble by stacking the layers in rainbow order with frosting between each. Frost the outside, leaving it semi-naked if desired.
- Chill the cake for at least 30 minutes before slicing and serving.
Always use gel food coloring for vibrant hues without thinning the batter. Chill between stacking layers for better stability. Use a serrated knife to level layers for a perfect finish. A semi-naked frosting style lets the colors shine. Warm your knife before slicing for clean cuts.
Ingredients

Gathering the ingredients for a Rainbow Cake feels like assembling a palette for a masterpiece. Each item promises a little magic, ready to come alive with color and warmth.
| Cake Ingredients | |
|---|---|
| All-purpose flour | 3 ½ cups (420g) |
| Baking powder | 2 ½ tsp |
| Baking soda | ½ tsp |
| Salt | 1 tsp |
| Unsalted butter, softened | 1 cup (230g) |
| Granulated sugar | 2 cups (400g) |
| Large eggs, room temperature | 5 |
| Pure vanilla extract | 1 tbsp |
| Buttermilk, room temperature | 1 ½ cups (360ml) |
| Gel food coloring (red, orange, yellow, green, blue, purple) | As needed |
| Frosting Ingredients | |
|---|---|
| Unsalted butter, softened | 2 cups (460g) |
| Powdered sugar, sifted | 6 cups (720g) |
| Pure vanilla extract | 2 tsp |
| Heavy cream or milk | 2–4 tbsp |
I always prefer gel food coloring over liquid because it gives those vivid, happy colors without thinning the batter. It’s the same trick I use for the layers in my Tennessee Jam Cake, where deep, rich colors make all the difference.
Having quality vanilla extract and real butter is like painting with the finest oils—they’re the foundation of every great Rainbow Cake.
Step-by-Step Instructions
Baking a Rainbow Cake is like crafting a work of art layer by layer, each one telling a piece of the story. Here’s how we bring this colorful dream to life:
1. Preheat and Prepare
Preheat your oven to 350°F (175°C). Grease and line six 6-inch cake pans (or work in batches if you don’t have six). Trust me, good parchment paper is your best friend here.
2. Mix the Dry Ingredients
In a large bowl, whisk together the flour, baking powder, baking soda, and salt. The dry ingredients are like the canvas — sturdy and ready to hold the vibrant paints.
3. Cream the Butter and Sugar
In another bowl, beat the butter and sugar until light and fluffy, about 3–5 minutes. This is the moment the kitchen fills with the cozy scent of home.
4. Add the Eggs and Vanilla
Beat in the eggs, one at a time, ensuring each is fully incorporated. Stir in the vanilla extract—that familiar, sweet perfume that lingers long after baking is done.
5. Alternate Adding Buttermilk and Dry Mixture
Add the dry ingredients in three parts, alternating with the buttermilk, starting and ending with the dry. Mix just until combined—overmixing is the enemy of tenderness.
6. Divide and Color the Batter
Divide the batter evenly into six bowls. Tint each with a different gel food color—red, orange, yellow, green, blue, and purple. Watching the colors swirl is like catching a glimpse of a rainbow forming. (For a shortcut version, check out my quick Biscoff Mug Cake — it’s magic in minutes.)
7. Bake the Layers
Pour each colored batter into the prepared pans. Bake for about 15–18 minutes, or until a toothpick inserted comes out clean. Let them cool completely on wire racks.
8. Make the Frosting
While the cakes cool, beat the butter until creamy. Gradually add the powdered sugar, then the vanilla and cream until you have a smooth, fluffy frosting.
9. Assemble the Cake
Place the purple layer on a cake stand, spread a layer of frosting, then continue with blue, green, yellow, orange, and red. Frost the outside generously. I like to leave it semi-naked so a hint of those cheerful colors peeks through, just like I do with my Strawberry Ladyfinger Cake.
10. Chill and Serve
Refrigerate the cake for at least 30 minutes before slicing—this sets the layers beautifully. When you cut into it, each slice is a celebration.
Rafel’s Tips
Every Rainbow Cake I bake teaches me something new. It’s a dance of color, patience, and a bit of whimsy. Here are a few tips I’ve gathered along the way to make sure your Rainbow Cake is as joyful to create as it is to eat:
1. Use Gel Colors, Always
Gel food coloring gives you those vivid, striking hues without watering down the batter. Liquid colors just can’t compete. This trick is essential, much like when I carefully tint the layers of my Coconut Vanilla Almond Cake for that perfect pastel beauty.
2. Level Your Layers
If your Rainbow Cake layers dome a little during baking, don’t be afraid to trim them. A serrated knife and a gentle hand will do the trick. Flat layers make for a stunning final slice.
3. Chill Between Layers
A short chill between stacking each Rainbow Cake layer helps keep the cake stable. Especially with all that color and frosting, a little patience goes a long way.
4. Keep It Semi-Naked
I adore a semi-naked look for a Rainbow Cake—a whisper of frosting allows the colors to shine through and adds rustic charm.
5. Slice with a Warm Knife
Dip your knife in warm water and wipe it dry before each cut. It gives you those clean, envy-worthy slices.
Baking a Rainbow Cake reminds me why I fell in love with baking in the first place—it’s like capturing happiness in edible form. Like my Oreo Ice Cream Cake, it’s a showstopper without being complicated.
Variations
The beauty of a Rainbow Cake lies not only in its colors but also in how it can be a canvas for creativity. Sometimes, depending on the occasion or mood, I like to tweak it just a little to surprise my guests — or even myself.
1. Pastel Rainbow Cake
For a softer, dreamier look, use less gel coloring to create pastel shades. It gives the cake a tender, almost vintage charm, much like the subtle elegance of my Strawberry Ladyfinger Cake.
2. Chocolate Rainbow Cake
Swap out half of the flour for cocoa powder in each layer to make a rich, chocolatey version. Imagine slicing into a swirl of rainbow and chocolate — a delightful surprise!
3. Rainbow Ombre Cake
Instead of bold, distinct layers, gradually deepen the color intensity from the top layer to the bottom for a gorgeous ombre effect. It reminds me of the beauty in the layers of a Matcha Cake — subtle but stunning.
4. Mini Rainbow Cakes
Bake the batter in cupcake tins for individual mini rainbow delights. Perfect for parties where everyone wants their own piece of the rainbow.
5. Funfetti Rainbow Cake
Fold colorful sprinkles into the batter for a double burst of color and joy. When you slice into it, it’s like fireworks in cake form — just like the festive spirit in my Lemon Dump Cake with Cream Cheese.
No matter which variation you choose, each Rainbow Cake tells its own colorful story — a little twist on tradition, but always full of heart.
Serving Ideas

A Rainbow Cake is already a centerpiece on its own, but how you serve it can turn the moment into pure magic. Every slice reveals a hidden burst of color, and I love pairing it with simple, thoughtful touches that make the experience even more special.
1. Fresh Berries and Whipped Cream
Serve each slice with a handful of fresh berries and a dollop of whipped cream. The tartness of the berries balances the sweet layers, making every bite feel light and refreshing—similar to how I love serving my Raspberry White Chocolate Mug Cake for a quick burst of sweetness and tartness.
2. Drizzle of White Chocolate
A gentle drizzle of melted white chocolate over each slice adds an extra layer of indulgence. It melts just slightly over the frosting and creates a luxurious mouthfeel.
3. Rainbow Sprinkles
For extra fun, scatter rainbow sprinkles around the serving plate. It’s playful and perfect for birthday parties or anytime you want to spark a little extra joy.
4. Ice Cream on the Side
A scoop of vanilla or even fruity sorbet alongside a slice of Rainbow Cake brings an extra touch of creaminess and fun. Think of it as a grown-up version of the celebrations we had as kids.
5. Tea or Sparkling Lemonade
Pair your cake with a pot of floral tea or a glass of sparkling lemonade. The lightness of the drink lets the colors and flavors of the Rainbow Cake truly shine.
Each time I plate a slice, I remember that feeling of wide-eyed wonder — much like the first time I saw my Tuxedo Cake gleaming under soft kitchen lights.
Conclusion
Baking a Rainbow Cake is more than just mixing batter and swirling colors—it’s about creating a moment that lingers in the heart. Every vibrant slice is a little reminder that life, like baking, is full of layers: some bold, some gentle, all beautiful in their own way.
When I bake this cake, I think of my grandmother’s kitchen, the wooden spoon clutched in my small hand, and her laughter filling the air like a song. I think of birthdays, celebrations, and quiet afternoons when a little color was all we needed to feel special. This Rainbow Cake is my love letter to those memories and to every joyful moment still to come.
If you enjoyed this journey, you might also find joy in the comforting layers of my Happy Birthday Cake, another timeless classic that brings back sweet memories with every bite.
For more heartwarming recipes and behind-the-scenes baking moments, join me on Facebook and Pinterest. Let’s bake and create memories together!
FAQs about Rainbow Cake
Can I make the Rainbow Cake in advance?
Absolutely! I often bake the layers a day ahead and wrap them tightly in plastic wrap once cooled. Assemble and frost the next day for a fresher, stress-free experience.
How do I get vibrant colors without making the batter runny?
The secret is using gel food coloring. It gives intense color without adding extra liquid, keeping the batter thick and perfect for those tall, beautiful layers.
Can I freeze the Rainbow Cake?
Yes, you can! Freeze the unfrosted layers wrapped well in plastic wrap and aluminum foil for up to two months. Thaw them overnight in the fridge before frosting. Just like when I make extra layers for my Happy Birthday Cake, it’s a real time-saver.
What if I don’t have six pans?
No problem! You can bake the layers in batches. Just divide the batter equally, bake two or three layers at a time, and keep the remaining batter covered at room temperature.
Can I use natural food coloring?
You can! Natural food colorings made from fruit and vegetable extracts are a beautiful alternative, although the colors will be softer—perfect for a more rustic or pastel-themed Rainbow Cake.
How do I get even cake layers?
Use a kitchen scale to weigh the batter before dividing it among your pans. It ensures that every layer bakes evenly, giving you that stunning, symmetrical rainbow effect.