Oreo Ice Cream Cake: Easy No-Bake Summer Dessert
Every summer, my grandmother would surprise us with her homemade Oreo ice cream cake. That irresistible combo of creamy layers and crunchy cookies quickly became a family tradition. The anticipation of that first bite—cool, chocolaty, and comforting—was the highlight of every gathering. Now, I’m beyond excited to share this beloved Oreo ice cream cake recipe with you, so you can pass along the joy and sweetness in your own home.
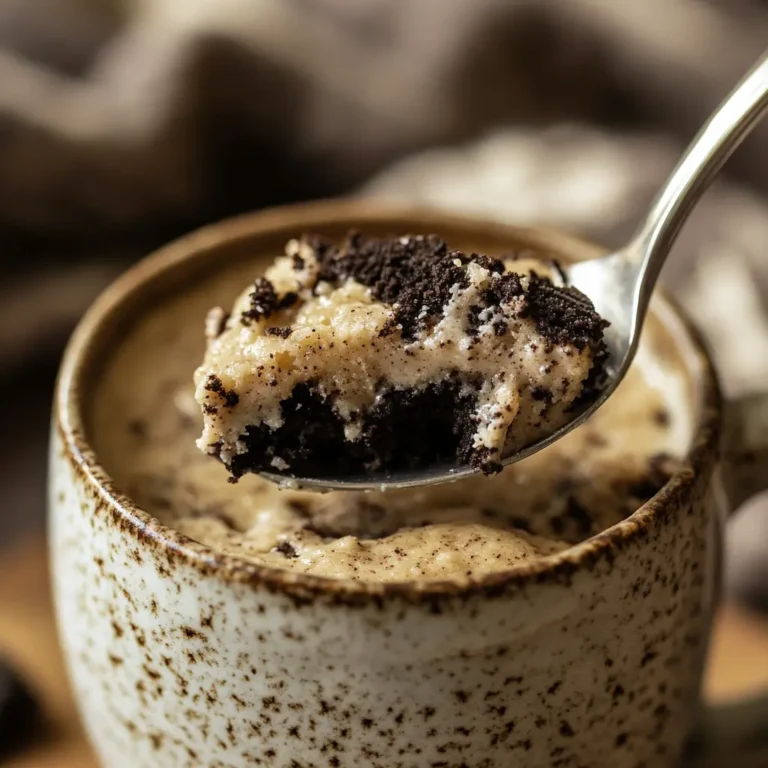
From the very first bite, this Oreo ice cream cake delivers a whirlwind of textures and flavors that feel like a celebration on your tongue. The base—made of crushed Oreos and butter—adds a satisfying crunch, a contrast to the dreamy softness of the vanilla ice cream that follows.
As your fork dives deeper, the swirls of rich chocolate fudge begin to melt slightly against the cold layers, creating a luscious harmony of hot-and-cold sweetness. That playful mix of creamy and crunchy, cold and gooey, is what makes every slice of Oreo ice cream cake so irresistible.
The final flourish of whipped topping brings it all together with a silky finish, making each bite feel indulgent yet comforting. It’s the kind of dessert that pulls you back in for seconds, then thirds—each taste a memory in the making.
Oreo Ice Cream Cake: Easy No-Bake Summer Dessert
A nostalgic, no-bake dessert featuring layers of crushed Oreos, creamy vanilla ice cream, rich chocolate fudge, and fluffy whipped topping—perfect for summer gatherings and family celebrations.
- 1 package (14.3 oz Oreo cookies, crushed (reserve 6–8 whole for topping))
- 1/4 cup melted butter
- 1.5 quarts vanilla ice cream (slightly softened)
- 1 cup chocolate fudge sauce
- 1 tub (8 oz whipped topping (e.g., Cool Whip))
- Crush the Oreo cookies using a food processor or by placing them in a zip-top bag and crushing with a rolling pin. Reserve 6–8 whole Oreos for garnish.
- In a mixing bowl, combine the crushed Oreos with melted butter. Press the mixture into the bottom of a 9-inch springform pan or baking dish to form the crust.
- Spoon a layer of softened vanilla ice cream over the Oreo crust. Spread evenly with a spatula. Freeze for 30 minutes to set.
- Drizzle a generous layer of chocolate fudge sauce over the ice cream. Optionally, swirl gently for a marbled effect.
- Add another layer of crushed Oreos, followed by more vanilla ice cream. Top with a thick layer of whipped topping.
- Freeze the assembled cake for at least 4 hours, or overnight for best results.
- Before serving, decorate with the reserved whole Oreos or sprinkle extra crushed cookies on top. Let sit at room temperature for 5–10 minutes before slicing for clean cuts.
Variations: – Flavor Swap: Use mint chocolate chip or cookies and cream ice cream for a twist. – Vegan Option: Substitute with plant-based ice cream, vegan butter, and coconut whipped topping. Ensure Oreos are vegan. – Extra Crunch: Add a layer of crushed pretzels or chocolate chips. – Fruit Fusion: Incorporate a layer of fresh raspberries or sliced bananas. Tips: – Soften ice cream for 10–15 minutes before spreading. – Freeze each layer before adding the next to maintain structure. – A springform pan facilitates easier serving and neat layers. Storage: – Store covered in the freezer for up to 7 days. – For best slicing, allow the cake to sit at room temperature for 5–10 minutes before cutting.
Ingredients & Preparation
Bringing this no-bake Oreo ice cream cake to life is easier than you’d think. With just a handful of ingredients and a little layering magic, you’ll create a dessert that’s both show-stopping and insanely simple.

Ingredients Table
| Ingredient | Amount | Notes |
|---|---|---|
| Oreo cookies | 1 package (14.3 oz) | Crushed, reserve some whole for topping |
| Butter | 1/4 cup (melted) | To bind the crust |
| Vanilla ice cream | 1.5 quarts | Slightly softened |
| Chocolate fudge sauce | 1 cup | For drizzling and layering |
| Whipped topping (like Cool Whip) | 1 tub (8 oz) | For the creamy top layer |
Preparation Steps
- Crush & Mix
- Start by crushing the Oreo cookies (a food processor makes this part quick and easy). Set aside 6–8 whole Oreos for garnish. Mix the crushed cookies with melted butter to form the base of your Oreo ice cream cake, then press it into the bottom of a 9-inch springform pan or baking dish.
- Layer Ice Cream
- Spoon a layer of softened vanilla ice cream over the Oreo crust. Spread it evenly with a spatula, then place the cake in the freezer for 30 minutes to set.
- Add Fudge Magic
- Once firm, drizzle a generous layer of chocolate fudge sauce over the ice cream. You can even swirl it in gently for a beautiful marbled effect that elevates the look of your Oreo ice cream cake.
- Repeat & Chill
- Add another layer of crushed Oreos, then more vanilla ice cream, and finally top it all off with a thick layer of whipped topping. Freeze the entire Oreo ice cream cake for at least 4 hours, or overnight for best results.
- Garnish & Serve
- Just before serving, decorate with the whole Oreos you set aside earlier, or sprinkle extra crushed cookies on top. Slice, serve, and watch everyone light up with delight at each creamy, chocolaty bite of your homemade Oreo ice cream cake.
Variations, Tips & Storage
One of the best things about this Oreo ice cream cake—besides how insanely delicious it is—is how flexible it can be. Whether you’re customizing for dietary needs or personal taste, there’s a version of this cake for everyone.
Smart Variations
- Flavor Swap: Try mint chocolate chip or cookies and cream ice cream for a fresh twist.
- Vegan Option: Use plant-based ice cream, vegan butter, and coconut whipped topping. Double-check that your Oreos are the vegan version (some are!).
- Extra Crunch: Add a layer of crushed pretzels or chocolate chips for more texture and salty-sweet fun.
- Fruit Fusion: A hidden layer of fresh raspberries or sliced bananas pairs beautifully with the cookies and cream flavor.
A hidden layer of fresh raspberries or sliced bananas pairs beautifully with the cookies and cream flavor
Expert Tips
- Softened Ice Cream: Let your ice cream sit out for 10–15 minutes before spreading—it’ll glide across your crust like a dream.
- Freeze Between Layers: Freezing each layer before adding the next helps everything stay neat and firm.
- Springform Pan Love: Using a springform pan makes serving extra easy and gives you those beautiful layers.
Storage & Make-Ahead
- Store It: Keep your Oreo ice cream cake tightly covered in the freezer. It stays fresh and fabulous for up to 7 days.
- Make Ahead: Prepare the cake a day or two in advance. In fact, it slices even better when it’s had time to set overnight.
- Serving Tip: Let it sit at room temperature for 5–10 minutes before slicing for the smoothest, cleanest cuts.
Every time I make this Oreo ice cream cake, I’m transported back to those carefree summers on my grandparents’ porch—bare feet on cool concrete, the sun setting low, and laughter echoing from every corner. My grandma would serve thick slices of her famous cake on paper plates with little plastic forks, and we’d savor every bite as if it were treasure.
This cake isn’t just a dessert—it’s a memory maker. Whether you’re celebrating a birthday, hosting a backyard BBQ, or just need a sweet pick-me-up, it fits right in.
Serving Ideas

- Party-Perfect: Decorate the top with colorful sprinkles or a drizzle of caramel for a festive finish.
- Individual Servings: Make mini versions in mason jars for a cute, portable treat.
- Hot & Cold Combo: Serve with a warm cup of coffee or hot cocoa—the contrast is pure joy.
Emotional Touch
There’s something deeply comforting about the way this Oreo ice cream cake brings people together. It’s the kind of dessert that sparks stories, shared glances, and second helpings. I’ve made it for friends going through tough times and for children’s birthdays alike—it always brings smiles.
And if you ever share it at a gathering, be ready to write down the recipe. Someone will ask. Always.
Conclusion
This Oreo ice cream cake isn’t just a dessert—it’s a love letter to simpler times, family traditions, and the small moments that stay with us forever. From the crunch of those chocolatey cookie layers to the creamy, chilled sweetness of every bite, this cake wraps you in comfort like a warm hug on a summer night.
It’s easy to make, unforgettable to eat, and powerful in its ability to connect hearts through shared joy. So, whether you’re crafting it for a special occasion or just because, know that each slice carries with it a little bit of magic—and a whole lot of love.
Go ahead, make it today. Then share it, smile, and remember: the sweetest memories are often the ones we bake ourselves.
FAQs
1. Can I use a different type of cookie for this Oreo ice cream cake?
Absolutely! While Oreos add that classic taste, feel free to swap in chocolate chip cookies, graham crackers, or even peanut butter cookies for a fun twist.
2. How long should I freeze the cake before serving?
For best results, freeze it for at least 4 hours. Overnight is ideal if you want clean, firm slices.
3. What’s the best way to cut the cake?
Let it sit at room temperature for 5–10 minutes, then use a knife dipped in warm water to make smooth, clean cuts.
4. Can I make it in advance?
Yes! This cake is perfect for making 1–2 days ahead. Just keep it covered in the freezer until you’re ready to serve.
5. Is there a way to make this Oreo ice cream cake gluten-free?
Definitely. Use gluten-free Oreos and double-check that your ice cream and toppings are certified gluten-free.
6. Can I add other toppings?
Of course! Crushed nuts, toffee bits, caramel drizzle, or even fresh fruit can add texture and flavor.
7. Will this work in a regular baking dish instead of a springform pan?
Yes, a 9×13-inch dish works well—just keep in mind that slices may be a bit softer and less defined.
8. Where can I find more easy no-bake dessert recipes?
Be sure to check out more of my creations on [My Facebook Page] and get inspired by visuals on [My Pinterest Page]!